Cawthorn Camps is a fascinating – and enigmatic – site with the remains of a Roman camp in addition to two Roman forts, one of which had an annex. The earthen ramparts and gates are particularly well preserved.
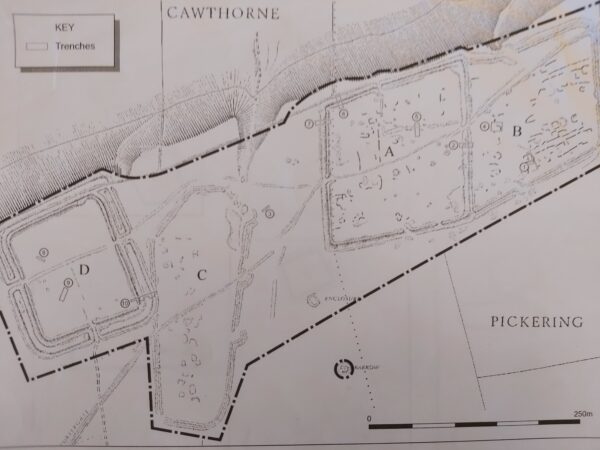
During the 1920s it was excavated by the eminent archaeologist Sir Ian Richmond and his colleagues. He proposed that the earthworks had been constructed for training purposes between the late 1st century and the early 2nd century. But more recent work by Graham Lee and Pete Wilson has led to a reassessment of Cawthorn (Figure 1). It is now considered that it was an integral component of the Roman occupation of Yorkshire involving several building phases over a period of around 40 years.
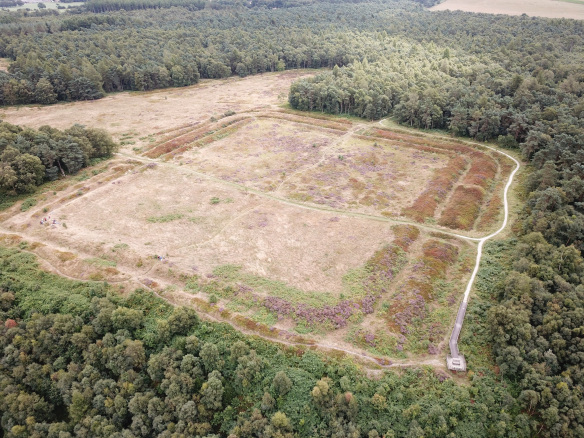
It is suggested that the first military structure constructed by the Roman forces was a temporary fort (D) (Figure 2). This would have been a rectangular enclosure with rounded corners and surrounded by a single ditch. Such forts typically had a headquarters building (principia) in the centre, flanked by a house for the commander (praetorium) on one side and one or more granaries (horrea) on the other. Most of the rest of the fort’s interior would have been taken up with ordered rows of barrack blocks.
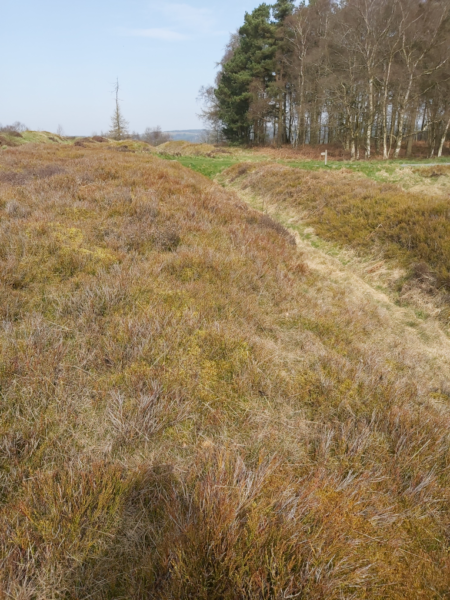
Some years later a re-occupation of (D) entailed digging an outer Punic ditch (Figure 3). This was constructed with a gently sloping inner wall and a steep outer wall: easy to jump in but tricky to get out! Importantly these two periods of use (probably around AD 80 and AD 120) match those for the fort at Lease Rigg a few miles north.
Roman camps had no fixed internal structures with troops being accommodated in tents. They were only occupied for a few days or weeks with the perimeter defences being less substantial in comparison with forts and topped with a row of sharpened stakes.
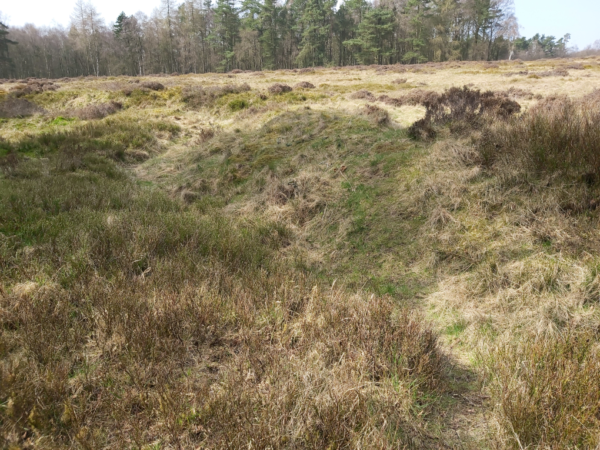
The camp at Cawthorn (C) is surrounded by a coffin shaped rampart and three clavicula-type gates can still be clearly seen (Figure 4). Claviculae were designed to force attackers to pass through the gateway sideways with their sword-arms exposed. There were various types of camp and (C) was probably a construction camp linked to the building of another temporary fort (A) to the east. The lack of any gates on the west side of the camp might relate to a continuing occupation of fort (D) when the camp was established. However, the second outer ditch of fort (D) broke through the defences of this camp, indicating that, by then, the camp had been abandoned.
Fort A was a substantial structure with a deep ditch (4.5 metres X 2.1 metres) and double claviculae. The 1930s excavations identified post holes and some vestiges of timber ramparts in addition to the possible remains of a platform for a ballista in the south east corner. Also, a prehistoric burial mound in the centre of the fort might have been remodelled by the Romans into a tribunal, from which senior officers could have addressed the troops.
Many Roman forts had attached annexes providing additional space for storage and accommodation (particularly for goods, animals and troops in transit) in addition to facilities such as workshops. At Cawthorn it seems highly likely that the earthworks east of fort (A) served as such an annex (B). There is also evidence for stone ovens and hearths in addition to turf-built structures linked to the Roman occupation within both fort (A) and annex (B).
Today Cawthorn still puzzles many historians and archaeologists. Questions remain about the routes followed by the troops to and from the site as well as the reason for choosing a location with such a poor water supply. There have also been few finds with no coins and only a minimal amount of pottery being unearthed. But it is important to appreciate that a Roman army on campaign made particular use of metal vessels – paterae – for cooking and eating. A fine example of a patera is Lucius’ Pan which has been marked with its owners name, hence Lucius, this is often on display at Malton Museum.
Figure 1: Plan of Cawthorn Camps showing recent excavation trenches ©English Heritage
Figure 2: Overview of Fort D and Camp C looking south ©English Heritage
Figure 3: The Punic ditch of Fort D ©Nick Summerton
Figure 4: A clavicula-type gate of Camp C ©Nick Summerton
Find out more about Cawthorn Camps from